Etsy Product Release : Easter Bunny Burlap Tote


Do you realize that Easter is in THREE weeks!? 


Surprise... The bunny will be hoppin' in early this year! 

Don't have a panic attack YET. We can help you take care of one thing....

Introducing the Easter Basket Tote:


Isn't it lovely??

You can find it in our Etsy shop here

My mom and I came up with this little beauty in February while JD was out of the country. She is a genius and I'm so thankful for our mother / daughter / closest girlfriend / business-partners relationship. I can't wait to show you the antique booth I helped her and dad set up at the Cotton Depot.

Now, back to the Easter totes...

Our little cousin, Emma Kate, came over for the day to be our Jitney model. She was a perfect lady and her mom dressed her in the PERFECT attire!! 


The bag is blurry in the photo below but it was such a sweet photo of Emma Kate that I couldn't resist in sharing it!! She showed off that tote like a paid pro.


The Deets:

This sweet Easter Bunny burlap tote bag is perfect for the kid on the hunt! It's large enough to hold tons of candy but small enough for a young child to carry around.

Don't forget to order one for your favorite teacher too!

One white Easter bunny is stenciled in the middle of the front of the bag. We handmake each bunny tail out of special paper. If you would like a different colored bunny, we would love for you to message us with your preference and we will customize your order without a problem. Each bag comes with a special Easter tag attached to one of the handles. The backside of the burlap bag is plain but can be stenciled with a name or monogram in any color for $3 extra. Message us and we will create a custom order if you would like it personalized.

The burlap bag is lined with a sheer thick material to prevent items from slipping through the burlap material. It has been coated with a protective coating for easier cleaning and color fastness. However, we do not recommend machine-washing. 

Dimensions: 9" x 11" x 4"

DIY Blog Design : How to Link Your Blog Buttons {Step-by-Step}

Yesterday we learned how to make blog buttons here

It's only fair to share the secrets of how to link the blog buttons, right?

Put your party hats on, people. It's time to learn...


Let's get started with a website to host your images.

Log into your account. 

If you don't have one, we suggest Flickr.

Hit the upload button (you'll find this at the top of the page).

Click "Choose photos and videos to upload" in the middle of the screen, select your blog button files and open those beauties.

Your page should look a little something like this: 


Now you're ready to rock 'n roll.

STEP 1: 
Because we don't like for our Flickr page to be filled with all of our bloggin' elements, we click the privacy button for these images. Hit "Only visible to you" and "Hidden from public searches" if you'd like to do the same.


Click the "Upload Photos" button at the top of the page and the buttons will begin publishing to your Flickr account. 


STEP 2:
Click on a blog button from your photostream. Hit the "Share" button and choose the "Grab the HTML/BB Code" tab. You will see your code as well as options for the image size. We went with the small size as it measures 200 x 200. Just the size we need for our sidebar.

Click on the code, right click and hit copy.

We're finished with Flickr for now. Let's move to your blogger dashboard. 


STEP 3:
Hit the Layout button on the sidebar menu.

Click "Add a Gadget".

P.S. Sorry for the overwhelming Layout template on the example. It's a little overcrowded...


STEP 4: 
Scroll down and click on the "HTML/JavaScript" button.


STEP 5:
A box will pop up like the above image. 

Paste your code from the Flickr account inside of the box.

We're going to mess around with code a little now...

STEP 6:
Replace the first link with the link to the page you would like the button to direct. For safe measures, delete only what is inside of the first set of quotation marks. (Although, I also like to delete the title gibberish too. If that's not too confusing, go for it!!)

For example, we want our France button to direct our readers to a page that shows all of our travels from France (which we haven't written about yet... note to self: need to get on that).

We replaced "http://www.flickr.com/photos/jitneysjourneys/8509521400/" title="CircleBlogButtonFrance by jitneysjourneys, on Flickr" with 
"http://jitneysjourneys.blogspot.com/search/label/France"

Leave the second link alone, as that is the link of the original image. 

Now we get something that looks a little like this:


Click "Save" on the HTML box.

Click "Save arrangement" on your dashboard.

Boo-yah.

You just linked up a blog button to a website.

You're awesome.

If everything went well for you, carry on, good friend! Otherwise, we've written up a couple of questions that we felt may be brought up among our readers and wrote the answers below. If we don't cover your question(s), write your question in the comment box of this post just in case others have similar inquiries and we will answer to the best of our abilities. :)

***

What is a label?

A label is a word you can use to identify a series of posts. You will find a box in which you can enter labels in the Post Settings toolbar. For example, we would write the word "tutorial" as a label for this post. Other labels could be "DIY" or "how to". On our sidebar, you will find a Tutorials button that will link you to all of our tutorials. The link for that is:
http://jitneysjourneys.blogspot.com/search/label/tutorial

If you have labels for a series of posts, you can use the same link format.
http://YOUR-DOMAIN-NAME-HERE/search/label/NAME-OF-LABEL

Use that link if you want to link a blog button to a series of posts.


***

Why does your new code have the dimensions of 170 x 170?

We decided that we wanted our sidebar to be smaller than 200 x 200 after seeing the finished product so we made the dimensions smaller to fit our ideal blog size. If this happens to you, you can change the dimensions in your code but be sure to keep the sizes consistent to the original dimensions (i.e. changing 200 x 150 would be 100 x 75 if you wanted to decrease the size by half).


DIY Blog Design : How to Make a Blog Button {Step-by-Step}

Today we're going over....


Are you pumped?

Let's do this.

**You can use any photo editing program but I believe Photoshop is the easiest - as well as the most convenient - tool when trying to make more than one blog button in the same format.

STEP 1: Getting Started
Open a new document in Photoshop. 
I made the dimensions 500 px x 500 px with a transparent background.
We will change the image size before posting the image but this size is much easier to work with.


STEP 2: Create an Ellipse
Click on the ellipse tool and create an ellipse by pulling from the top corner to the bottom corner, forming a perfect circle. Be sure to hold down the Shift button while creating the circle for perfect measurements on all sides.


STEP 3 : Place an Image
File  > Place 
Choose the main image you would like to use for your button.


STEP 4 : Size / Adjust the Image


STEP 5 : Grab & Pull
Grab and pull the ellipse shape into the same layer as the placed image. 

STEP 6 : Pioneer Woman Action
I use the "Seventies" action from the Pioneer Woman to add some vintage love on my blog button images. You can download her incredible group of Photoshop Actions here
If your actions window doesn't appear, click Window > Actions. After you download the actions, click the action you'd like to use and hit the Play button.


STEP 7 : Erase Background
Click on the Background Eraser Tool.
Select the Shape layer (unlike the screenshot below - whoops!).
Erase AWAY!! 


STEP 9 : Or Delete the Shape Entirely
I feel ridiculous after doing that step. You can delete the shape entirely and have the same outcome. 
But erasing is just so much fun...


STEP 9 : Add Banner
Find a banner image online and download (or you can make your own). 
File  > Place the banner. 


STEP 10 : Color Overlay
Pull up your color scheme in a different window so that you can still see the file you're working on AND the color palette. 
Double click on your banner layer.
Click on Color Overlay. 
Click on the color block to change the color of the banner.


STEP 11 : Change Banner Color
Click on the eyedropper tool.
Click a color of choice from your color palette with the eyedropper tool.
Click OK.
There's no need to copy the number. I'm not really sure why I put that there.


STEP 12 : Add Text
Click on the Type Tool.
Add text, change the size and have fun with font options.


STEP 13 : Align Layers
Maybe I don't know my way around PicMonkey enough yet, but this is a big reason I choose Photoshop over other photo editing programs.
Select the text and banner layers (hold down Command while clicking on the layers). 
Click Align Horizontal Centers. 
Boom. 
No eyeballin' here.

**Now is the best time to save this document. We will use this document as our Blog Button Template.
File > Save As > "Blog Button Template"
Save as a Photoshop (.psd) file. 


STEP 14 : Resize Image
Let's make this image the perfect size for your blog. 
I like 200 px x 200 px for a toolbar size. You may want to go smaller though. Just make sure that the width and height are the same sizes. 

Click OK. 
File > Save As > "Blog Button {Image Name}"
For example, I saved my image as "Blog Button France".
Save as a .png file.


STEP 15 : Create More Buttons
Guess what!? 
You don't have to start a new document in order to make more buttons. 
Open your Blog Button Template again.
File > Place a new button image.
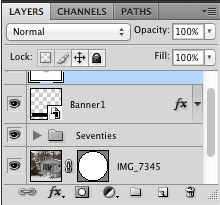
This image should be a layer in between the first image and action. Your Layers box should look a little something like this: 


Pull the circle shape into the new image layer. Click the eye on the first image layer so that you won't be able to see that image any longer.
Hopefully you have the image sitting perfectly in the circle now.
Change the text in the banner.

File > Save As > "Blog Button {New Image Name}"
For example, I saved my image as "Blog Button Bungalow".
Save as a .png file.

Voila! 

You just made two blog buttons. 
Whoop whoop!
Now you have the ability to make as many as you'd like!!

Come back tomorrow to see how we will place the buttons onto our blog.


We hope you enjoyed this tutorial - and that is was super thorough and helpful!
We aren't professional designers by any means but I love playing around with our blog's appearance on a frequent basis. Please let us know if you have any questions and we will try our best to help!


DIY Blog Design : How to Pick a Color Palette


Ok. So neither JD nor myself are professional graphic designers, by any means. However, I looove learning how to spice up our blog design on a very consistent basis. 

Anytime JD is away on travel or when we're off traveling somewhere together for his job, I revamp our blog design in some way or another. Designing helps ease my anxiety and makes the time fly by as I wait to have my husband back in my arms.


[Side note: Can you tell from our new design that JD has been out of the country for three weeks!? Needless to say, I really really missed him. I spent the three weeks with my parents crafting, leather-working and helping to set up my mom's booth at The Cotton Depot. It was a beautiful time with our amazing friends and family in Georgia, but I still really missed my husband. He flew in Saturday where I greeted him with this painting at the airport. But more on that another day.]


It would be so much easier if I bought a template from one of the awesome professional designers on Etsy, but I'm a stubborn DIY-gal. 

A very stubborn DIY-gal... And I married a very stubborn DIY-guy. 

We're not stubborn in the sense of close-minded, rather in the sense of being frugal and wanting to do everything with our own hands.

So it only makes sense to try our hands at designing our own blog... right?

Now, let's get to chattin' about a main element of design.

Color.

It's crucial to design.
Absolutely crucial.
So choose wisely.
For our newly revamped blog design, I picked "Sparkled Hues" from Design Seeds.


I wanted a color palette that would incorporate the colors of spring but could possibly carry into summer, if needed. So we have Easter blues as well as a Fourth of July red, white and blue. I love the pop of red but only implement it in smaller places on our blog.

Color schemes are so wonderful and inspiring that I made a Pinterest board here. Color palettes are perfect for anything design... websites, home decor, sewing projects, weddings, you name it!

You want to choose a palette with four to six complementing colors to integrate into your design.

Here's a great tutorial from The Mother Huddle on how to create your own color palette using a photo with PicMonkey.

What do you think of this palette? 
What are your favorite colors to work with?


Spring Inspiration

Happy March!!


I've been crafting, designing, carving, stenciling, {you name it}...
Spring serves as one of our top inspirations and we can't wait to show you our newest projects!

We decided to do a little revamping to our blog, as we wanted to welcome March with brighter colors and a fresher design. We'll be sharing a few of our design tips next week.


How are you welcoming the new season?

Flower Arrangements 101 with JL Designs

Did you see this lovely rustic photo on your Instagram feed last week?


No? Well then, you can follow us here

;)

And guess what? I didn't buy that arrangement... I put it together with my own hands along with a few of these wonderful ladies, all thanks to JL Designs

Me, Mom, Lauren (cousin), Aunt Sonya, Meredith (cousin)

The night offered a delightful time filled with laughter, catching up with old friends and hanging out with our sweet family.

Mom and me

Our friend Jeff, owner of JL Designs, taught an amazing flower arrangement class! If you live in Walton County (Georgia), you MUST take one of his classes. 

Before I show you our photos from the class, you have to see some of his work. He was the florist for our wedding...

Read more about our wedding day here

Is this not the loveliest and most whimsical of bouquets you've ever seen?? I love those hydrangeas, feathers and the use of my great-grandmother's broach. 


Jeff helped us carry out our theme of nature, birds and nests. He was such an integral part in making our wedding day special. 

Kike Morales Photography

Back to the class... 

Jeff taught us how to arrange two bouquets in glass vases - all from a freshly-cut bouquet of long-stem flowers and greenery like you would get from a florist or in a grocery store.

I don't want to give away a lot of the details Jeff shared with us (out of respect for him and his business), but I'll share a few key points of basic flower arranging that everyone should know:

(1) Don't just toss that beautiful, aromatic bundle into the vase!! Trim your stems in a way that will add height and dimension to an arrangement. The shortest flowers should line up right above the lip of the vase.

(2) Put the greenery in first and fill in accordingly.

(3) Carry a color theme throughout the bouquet from top to the lip of the vase. Our pop of color was purple.


The second arrangement Jeff taught was this {sigh} absolutely stunning hydrangea and white rose arrangement.

This was honestly the coolest technique I've ever seen for arranging flowers. I will be using it any and every time we have friends over for dinner!!


It's rare to see a business willing to teach details about their profession to their customers. Jeff encouraged us all to make our own arrangements at home (even though most of the class will still run to him for all florist needs - there's no comparison to his work). All that to say, JL Designs is a fantastic company with an awesome willingness and loyalty to go above and beyond for their customers.

Thank you Jeff, Amber and Andrea at JL Designs for hosting this fantastic class!

Check out their Facebook page here and see more photos from the class. 

What Does Love Look Like to You?...

Happy Monday! 

 Lindsy at LMR Photos shared Kid President's Pep Talk on Valentine's Day. To say that I was super encouraged and inspired, would be a dramatic understatement. So I browsed through the Favorites on the SoulPancake YouTube channel and found this gem. If you have time, I highly encourage you to watch a few more videos on SoulPancake's Favorites. They're awesome.


So, we want to know... What does love look like to you?

Perfume Pickin'

Blog Post Update:
In November, I asked for suggestions on perfume here

Two sweet friends responded with Woman in Yellow, by Oiseau at Anthro. 

So we made a trip to Anthropologie. I told JD to search around to see if he could find a perfume he liked. When I walked over to him, he had this delightfully smelling fragrance in hand:

Lollia Eau De Parfum : In Love 
the delicate aromas of apple blossom, jasmine and rose


Then we picked up this lovely candle.
{swoon}

Capri Blue Mercury Glass Jar Candle : Volcano
tropical fruits, sugared oranges, lemons, and limes, redolent with lightly exotic mountain greens


Finally, we found Woman in Yellow and fell in love with the perfume! I may have snatched up a bottle of that too. ;)

Oiseau Eau De Toilette : Woman in Yellow 
subtle florals melded with musk, mimosa and ylang-ylang


I feel so womanly now that I actually feel compelled to wear lipstick on a daily basis too.

What is your signature scent?


That's Amore : A Todd Nest Valentine's Day Tradition

Happy Valentine's Day!!


Is that an ironing board... with chicken and candles?

Why, yes, it most certainly is.

Valentine's Day is a super sweet day for couples, but let's be honest here - 
Restaurants are always packed and overpriced,
heels are nice but house shoes are comfier,
floral arrangements are expensive and
candles sure smell sweeter in your own home.

{can you tell we're homebodies?}

So we celebrate Valentine's Day by cooking dinner together,
in our own home, and setting it all up on our ironing board by candlelight,
just like we did in 2009 in my ole' apartment at Auburn University.

Oh - and lots of chocolate. We eat lots of chocolate. :)


As cliche as it sounds, every day is Valentine's Day for us. We love marriage, we love each other and we love celebrating those things every single day. I can't imagine our marriage being any other way.

JD and I love creating new traditions and celebrating old traditions as Mr. & Mrs. 
As quirky and simple as it is, we wanted to give you a little sneak peek into the way we have celebrated love on Valentine's Day.

Do you have any special Valentine's Day traditions?


Twenty-five...


At least that's what I'm hoping for...

Have you signed up for the Anthropologie card? I was super excited when we first moved up to Huntsville and saw that the nearest Anthropologie was only a few miles away.

Oh, who am I kidding..?
I'm STILL super excited that Anthro is that close to us! 


I turned 25 last Tuesday. Maybe you can believe that, but 25 is kind of a big age to wrap my head around. It's certainly not old, but it makes you feel like you're at least getting old

Kids call you ma'am. 
Your body gets a little love-handlier.
Ambition drives you more because 
you realize this is really the time to make of yourself who you want to become.
Big decisions are bigger than ever.
You're an adult and you should probably dress like it.
Health seems to become a trillion times more important.
Moments become sweeter by the day.
Then you realize that 25 is halfway to 50.

As JD says, this can be a half glass full or half glass empty mentality.

Obviously, it must be the half glass full mentality. There is so much more I can't wait to achieve and embark upon before I'm 50 years old. More traveling, more creating, more loving.

And I can't wait to start it all full-force in this year of my life with my sweet husband by my side.


What was turning 25 like for you? 
What has been your favorite age?