Guest Blogger : Molly @ Still Being [Molly]

second trimester maternity style - cobalt and white striped Old Navy jersey dress, yellow belt, cobalt Converse Chuck Taylor's - North Carolina Fashion Blogger

Hey everyone! My name is Molly and I blog at still being [molly]. I blog about fashion, my faith, my friends and family, being married, and food! I am SO excited to be guest posting for JD and Whitney today! I absolutely LOVE them and their blog and so I was so honored when they asked me to guest post while they are on their next travel expedition! Well, since the weather is getting warmer and Spring is finally here, that means it's the PERFECT weather for a good burger! I mean, really though, anytime of year is a good time for a burger, but you know what I mean. Well, I want to share with you one of my recipes for my delicious homemade salsa + turkey burgers!


RECIPE: Salsa Turkey Burgers - still being molly

Molly’s Homemade Salsa & Salsa Turkey Burger Recipe(s)
For Molly’s Homemade Salsa (just combine all these ingredients in a blender and boom! you’re done):
  • 1, 14 oz can diced tomatoes
  • 1, 14 oz can fire roasted tomatoes (I used Great Value brand at Wal-Mart)
  • 1 medium red onion, quartered
  • 1 clove garlic, minced
  • 1-2 jalapeno(s), seeded or not (depends on if you want it spicy – I like it really spicy so I use two fresh jalapenos)
  • 1 teaspoon honey
  • 1 teaspoon chili powder
  • 1/2 teaspoon salt
  • 1/2 teaspoon pepper
  • 1/2 teaspoon ground cumin
  • 1/2 teaspoon red pepper flakes
  • 1/2 teaspoon cayenne powder
  • small handful of fresh cilantro, washed
  • 1/2 tablespoon orange juice
  • juice of 1 fresh lime -or- 1 teaspoon of lime juice
Ingredients for the Patties (Yields 4-6 burgers (depending on how big you make the patties)):
  • 1lb of lean ground turkey meat (you can also use ground chicken or ground beef)
  • 2-4 tablespoons of your favorite salsa (I use my homemade salsa – recipe provided above, but you can use any salsa)
  • 1/2 teaspoon ground cumin
  • 1 teaspoon chili powder
  • 1/2 clove minced garlic (or use 1/4 teaspoon garlic powder)
  • 1/2 teaspoon cayenne pepper
  • 1 teaspoon of red pepper flakes
  • 1/4 teaspoon salt
  • 1/4 teaspoon pepper
Ingredients for the “Decoration” of the Burgers
  • 100% whole wheat hamburger buns (I like the Nature’s Own kind)
  • Chipotle Mayo
  • Jalapenos (you can use fresh or pickled… for these burgers I use pickled)
  • Pepperjack cheese
  • Lettuce
  • Tomato
MAKING THE PATTIES: Okay, after you’ve made your salsa (or picked out which store-bought salsa you want to use), you’re going to take the ground turkey and place it in a bowl. This part can get kinda gross, and it’s good to have a helper because you want to avoid touching ANYTHING after you’ve touched the raw meat. Combine the turkey, salsa, and ALL seasonings for the patties in a large bowl and mix it with your hands. I actually used one hand to mix it all, that way I know I have one clean hand that I can pick up the ingredients with. Once you’ve got it good and mixed, now you make the patties. You can make the patties small or large depending on how big you want them, BUT, make sure they are FLAT. They will puff up in the middle when you broil them because they’re filled with juices… so make them as flat as you can before you put them in the oven. COOKING THE PATTIES: Now, you can totally GRILL these patties and they would be delicious, BUT, I actually BROIL these patties in the oven to keep them super juicy. If you decide to go this route, here's what you do: BROILING THE PATTIES: On a greased baking sheet, place the patties down with a little bit of salt and pepper on each side. Once the patties are on the baking sheet, place them in the oven with the oven on BROIL. Now, these cook FAST. Flip the patties every 4 minutes and pat them down with a spatula or whatever to flatten them out as they broil. Do this until the center of each patty reaches 165 degrees Fahrenheit. FOR THE PERFECTLY TOASTED BUNS: On the stove, place your buns with a little bit of Chipotle mayo spread on each side, face DOWN onto a large pan or skillet. Have the heat on low-medium. You can have these toasting while your patties are broiling. MAKING THE BURGERS: Okay, so once the burgers are cooked all the way through, you’re almost ready to eat! Put your patties on a plate and get your desired ingredients out. You’re ready to EAT! Here’s how my burger looks (in order of ingredient top to bottom):
  • Top Bun
  • Chipotle Mayo
  • Salsa
  • Jalapenos
  • Lettuce
  • Tomato
  • Pepper-jack cheese
  • Salsa turkey burger patty
  • Chipotle Mayo
  • Bottom Bun
Yeah, it's pretty much the most delicious thing ever. Now, time to enjoy! What about you? Do you have any delicious burger recipes you'd like to share? Be sure to stop by my blog and let me know! Thanks again to Whitney and JD for having me today!

Guest Blogger : Lindsy @ LMR Photos

Hi, there!  I'm Lindsy and I blog over at LMRphotos.com with my husband, Dan, but as a travelling musician and full-time dad he doesn't show up very often.  I'm a photographer, work at home mom, and we have a kiddo whom the internets shall call "BB", "The BeeBs" or "Baby Bread".

I am so honored that Whitney asked me to post for her while she travels!  I wanted to post about something very near to my heart:  foster parenting!  There seem to be so many misconceptions about foster parenting and I hear some crazy things from well-meaning people so I wanted to give my two cents.  We haven't been doing this long, just a little over a year and a half.  Being foster parents has radically changed our lives and we are beyond blessed by all that God has done for us. I've been getting some great questions in response to our Why We Became Foster Parents post so if you're interested go ahead and check that out and ask us anything!


Becoming a foster parent:  While you do have to pass a background check and complete an application and interview process, you don't have to be a lot of things that you might think you need to be! Race, ethnic background, and income level are not an issue for foster care. You dont have to be rich, married, a homeowner or live in a huge house and you can be a first- time parent.  We were licensed in 90 days and start receiving calls right away!  There are so many kids in the system that it doesn't take long.  This is awesome for adoption-minded families that may not want to wait months or years for a private agency.  As far as costs and services, our kiddo gets free daycare, food assistance, therapy and tons of hand-me-downs.  The stipend that you do get paid is, um, well, not much so you can guarantee that no one is signing up for foster care to make the big bucks.  Which is a good thing because it means that we're all doing it because we want to. 

Attachment:  To be honest, my love for BB was pretty shallow at first but it has grown as he's attached to us and we to him. When it comes to foster parenting, you can never hold back your love for these kids. These kids desperately need to know that they are loved whether they're with you for a day, week, year, or forever. We were told by a long- time foster-mom, "You are the adults, you can handle the loss and that is never a reason to withhold love!"  Loving just for the sake of loving, loving no matter what, that's true love.  I guess that's what we do. What fostering a child has done for me and my heart has been life-changing. Being a foster parent has been the most rewarding experience of my life. I'm taking care of someone's child, loving him as my own, attempting to give him the best childhood possible and showing him that there is a God who loves him. It’s awesome. Simply put.

We are so honored to have gotten many messages from people who have told us they're considering foster care now, too! That is the best news! If you feel a little tugging at your heart strings, please consider becoming a foster parent or donating your time/resources/hand-me-downs to a foster family. It is truly the best gift you can give a child.  If you want to know more, find a local agency and start asking questions and feel free to contact us, too!  


Guest Blogger : Ruthy @ Discovery Street


Hi there! I'm Ruthy from Discovery Street; a lifestyle blog documenting my days as a wife, new mom, and homeowner. Pre baby my life was about adventure, travels, food and making something from nothing--currently life revolves around a 17 pound blue eyed ginger haired girl named Parker Penny...I swear she's my daughter...but she clearly took after her father. 

Our path to where we currently are in life was not the road most traveled; but we wouldn't have it any other way.


WHAT I LEARNED IN PRE-MARITAL COUNSELING


I LOVED going to pre-marital counseling. But that probably doesn't come as a surprise to those who know me; I'm totally into psycho babble regarding personality assessments. I heart taking "get to know yourself better" tests. I love Myers Briggs, birth order analysis and learning about love languages. So seeing how my partner and I "matched" up was really fun and interesting. I think it helps that we were already "pre-determined" as compatible based on e-Harmony's matching system, but it was pretty confirming to hear our counselor say that we were one of the highest scoring couples he's ever counseled. (Aww yea!) I realize that points and answering questions on-line regarding our viewpoints on finances, children, roles, communication, etc are not the be all end all of determining a successful marriage. But it sure was great to learn that we have similar outlooks on the "big stuff."

The most significant thing I took from this experience was the answer to this question. Our counselor asked, "Five years from now, when the romance and novelty has worn off and you've had the fight to end all fights and I ask you, why did you marry _____, what is your answer?" We each answered sincerely and lovingly and looked back at our counselor pleased with our answers looking for affirmation. We learned our answers revolved around how I made Andyfeel and how he made me feel. He told us our answers revolved around ourselves....that the other person was fulfilling our individual expectations or desires. But what happens when those expectations or desires stop being met? This is when a lot of marriages start falling apart because this is the basis of "why I married _____." 

Our counselor explained that marriage is a calling. (*We went to a Christian counselor, so "calling" includes a spiritual connotation). Five, ten, or 20 years from now if Andy and I are going through a rough patch and someone asks me why I married him...I'll say without hesitation, I was called to. When you feel called to do something, when you know without a shadow of a doubt that your marriage is a divine appointment, you don't let anything stand in your way. This truly was an "ah-hah" moment for me. I wonder how many marriages might make it through the rough times if they truly understood before hand that they were called to be husband and wife. Called not to just love each other, but called to honor, respect and serve one another even when we don't feel like it.

Guest Blogger Intro!

Prepare yourselves.

The next four blog posts are going to rock your world, all thanks to the help of these lovely ladies:


We've asked Ruthy, Lindsy, Molly and Meg to entertain and challenge you while JD and I take off for a couple of weeks.

Y'all are going to love reading the posts these women have prepared. 

In the meantime, head over to their blogs and you will instantly see why I asked each of them specifically to share something amazing with you. They all have hearts for the Lord that will blow your mind and encourage you to live out the Gospel in a more beautiful way.

{scheduled for may 2}

Lindsy @ LMR Photos
{scheduled for may 7}

{scheduled for may 9}

{scheduled for may 14}


We're excited to return mid-May to share some amazing stories of how God is moving through our family!!


House Search Update

It's official. We have found a house!!

We signed the contract for it Monday and are having our home inspection TODAY!

I can't believe how quickly everything is going now that we have found a house we love.

The last few weeks have been uber stressful since our apartment lease is up at the beginning of July but we had to notify the apartment complex 60 days before moving out (beginning of May). Time was running out. We were at the point of either finding a house reallll quick or staying in the apartment for another year.

We looked at eight houses in one day. Not gonna lie, that day transpired from complete excitement to a major headache by the end of the home tour. Only one house blew us away though.

It was an older home, vacant, freshly painted in neutral colors, move-in ready, super amazing accents, a huge master bedroom suite and had a FABULOUS garden. Those were merely the small bonuses though. (Yes, an old home was a bonus for us.)

We're waiting to actually close on the house before we show photos or write much about it, as we're still trying to guard against loving it too much (sometimes things don't go as smoothly as hoped). Granted, I have already designed the "We've Moved" postcards with the new address so I guess we're not guarding our hopes too much.

Whoops!

We are so ready to move into the house and transform it into a home. The Pinterest boards have been filled, revamping lists have been created / prioritized and our minds have been racing with tons of ideas.  But it will all have to wait until the final documents have been signed.

With the crazy and stressful month we've had, I haven't had hardly any time to read about my bloggin' buddies lives. Please know that I miss y'all and can't wait to catch up soon!!

Obviously the next few weeks will be crazy still because of the house goings-on as well as another big adventure we'll be embarking on (we'll discuss later), but no worries. A few of my favorite bloggers will be taking over Jitney's Journeys in our absence to keep y'all entertained and challenged.


Do you have any suggestions for new homeowners / people who are buying their first home? What was your biggest joy and challenge in the process?


Phoster : In Love's Service, Only the Wounded Soldiers Can Serve


Did you get the free Phoster app two weeks ago from the iTunes store? 

I've been waiting to use an awesome quote and this one seemed pretty amazing. John Piper has a daily devotional app {John Piper Daily Devotional} that you should check out if you haven't already. This particular devotion was actually from March 6th but still wanted to share it with y'all.


The eternal God is your dwelling place and 
underneath are the everlasting arms. 
(Deuteronomy 33:27)

You may be going through things right now that are painfully preparing you for some precious service to Jesus and to his people. When a person strikes rock bottom with a sense of nothingness or helplessness, he may find that he has struck the Rock of Ages.

I remember a delicious sentence from Psalm 138 that we read at our breakfast devotions last Saturday: “Though the Lord is high, he regards the lowly.”

You cannot sink so low in despairing of your own resources that God does not see and care. In fact, he is at the bottom waiting to catch you. As Moses says, “The eternal God is your dwelling place and underneath are the everlasting arms” (Deuteronomy 33:27).

Yes, he sees you trembling and slipping. He could (and often did) grab you before you hit bottom. But this time he has some new lessons to teach.

The psalmist said in Psalm 119:71, “It was good for me that I was afflicted, that I might learn your statutes.” He does not say it was easy or fun or pleasant. In retrospect, he simply says, “It was good for me.”

Last week I was reading a book by a Scottish minister named James Stewart. He said, “In love’s service, only the wounded soldiers can serve.” That’s why I believe some of you are being prepared right now for some precious service of love. Because you are being wounded.

Do not think that your wound has come to you apart from God's gracious design. Remember his word: “See now that I, even I, am he, and there is no god besides me. . . . . I wound and I heal” (Deuteronomy 32:39).

May God grant a special grace to you who are groaning under some burden. Look eagerly for the new tenderness of love God is imparting to you even now.

“Only Wounded Soldiers Can Serve”


We hope this has been an encouragement to those who have been wounded, those who have hit rock bottom and those who are living out the precious service of love in the midst of healed wounds.

DIY : Antique Door Chalkboard and Inspiration Board Tutorial


There are TONS of tutorials on how to take an antique door and transform it into a chalkboard but I've had this baby tucked away for about a year now... and, well, it felt like it was finally time to piece it together and share it with y'all.

So grab your electric sander, paintin' pants and some good tunes.

Let's rock 'n roll. 


Supplies
electric sander
sand paper
several old rags
roller brush /  big-bristled paint brush
paint
antique glaze
[i also used the antique glaze from the Caromal Colours Reclaim line]
painter's tape
chalk


Step 1
Find an awesome antique door for a super low price.
Bring it home and set up shop.
My vision was to have a five panel door so that I could make four panels into chalkboards and create a cute design for the middle panel. My parents actually found this for me at an antique shop about an hour away from Huntsville.

Step 2
Paint the door the color of your choice.
I placed painter's tape over the door knob plate because it would add some contrast to the door.


Step 3
Break out a piece of sandpaper.
Sand the edges, corners and even brush along the surface in some falt areas to create the distressed look.
I love the rich brown of the original paint color that appears under the white.


Step 4
Wipe the debris of the sanded door away with an old, dry cloth.


Step 5
Paint antiquing glaze over the entire surface of the door and wipe away quickly with a damp cloth.
Paint the sanded areas more heavily if you'd like a deeper distressed look.
You can also use a flicking motion with a coarse-bristled brush to create splatters (see the example in the bottom three pics -- I blotted the the splatters so that they looked more natural and not so heavy).


Step 6
Place painter's tape around the edges of your panels.
Paint the magnetic primer on first if you'd like a magnetic chalkboard.
{I used the Rust-oleum Magnetic Primer but it doesn't hold magnets very well...}
Roll on the chalkboard paint (follow directions on the package for drying time and coats).


Step 7
Remove painter's tape after about a day of drying.
If you're lucky, the tape will remove some bits of the painted surface so that it gives even more of a distressed look - and you didn't even have to work for it!
Draw over entire chalkboard surface with a piece of chalk and erase.

Step 8
Nail some hooks and wire on the back, find the perfect place to hang it and...
voila! 


Hammer a decorative upholstery nail onto each side of the door and loop a string of twine around each one.
Hang inspiration pieces (such as buttons, ribbons, paint samples) and there ya have it: inspiration board, chalkboard and gorgeous piece all-in-one!


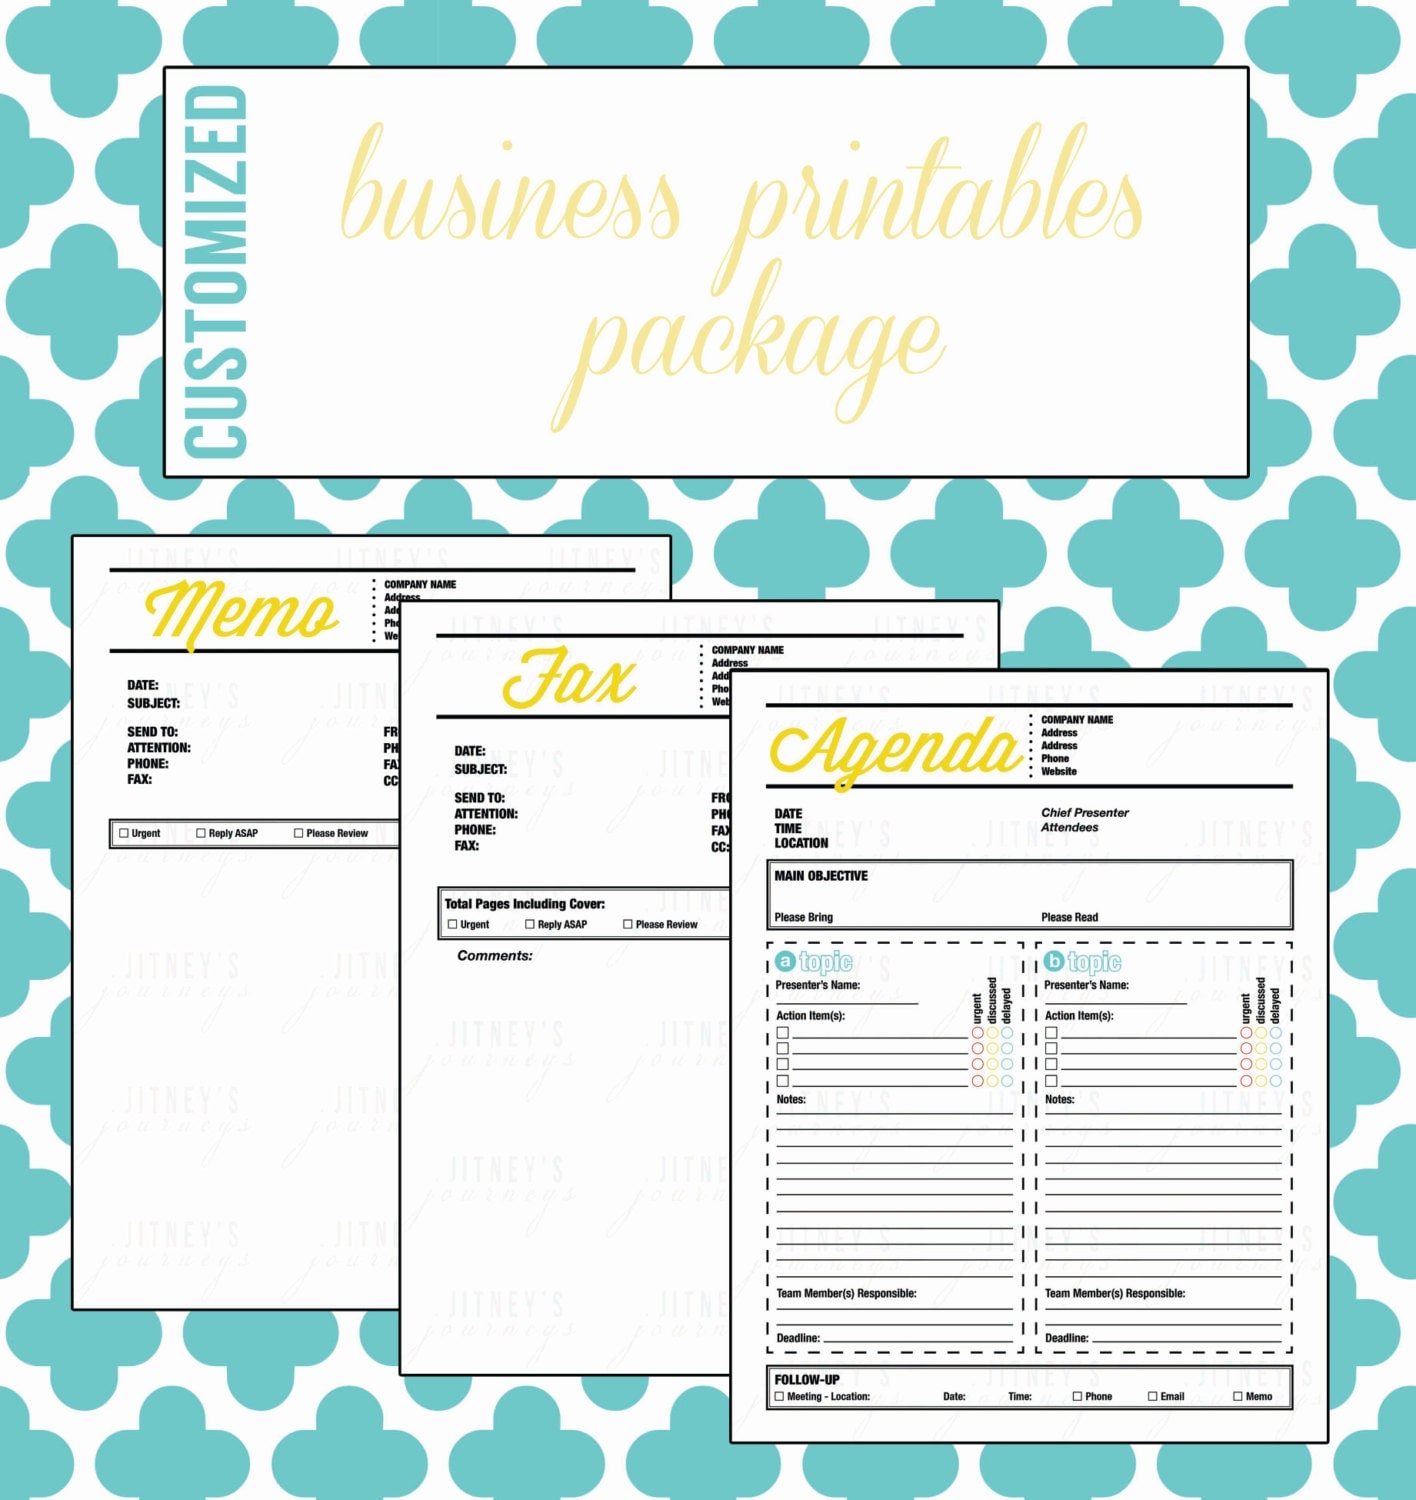
Etsy Shop : Business Printables Package {Customized}


Announcing the Business Printables Package!!

Conduct written documentation in the same manner of conducting business: with creativity and style.

This set includes a memo template, fax template and an agenda form.

Each document is customized for your company in the header section 
[Company Name]
[Address]
[Address]
[Phone Number]
[Email]

Would you prefer a different color palette or to add your logo?
No problem.
Send us your preferences in the message box and we will alter the design to fit your business needs.

You can find this awesome bundle of printables here.


We are always looking for more ideas when designing our printables. This week we are asking YOU to help us come up with ideas so that we can better fit a certain area of expertise that may not be represented in the "printables" world. We will design a set of [up to 4] printables especially for you for free when you send us your profession and types of lists / forms needed to fit your specific needs. 

For example, if you're a photographer, we will create a set of printables that includes a checklist of equipment to bring, client list form, checklist of photo ops, the day's agenda, etc.

You send the details, we'll create the design!

After we email you the PDF files, we will list similar designs in our Etsy shop for sale so that others can enjoy them too!

Free Printable!! Finding Our First Home with a House Searching Score Sheet


If you follow me on Pinterest, you have probably noticed a lengthy feed of house renovation inspirations. We haven't bought our first home yet but we are looking heavily.

It all started when I was searching on Trulia and Zillow for houses in our price range. We were debating between buying an old house and putting some elbow grease into it or just breaking down and buying a new home (aka: the cookie cutter). 

Everything we looked at in our range looked cheap (granted, our price range is super, super low). It was hard to imagine that we would ever move out of our spacious apartment into a home that we could really call home.

Then my mom sent me an email of one that we fell in love with

Borderline obsession.

It was an older home (1960s) but the family renovated it in such a perfect way. 
Barnwood accent wall.
Butcher block countertops with double oven and green accent cabinets.
Real brick and mortar backsplash.
Bathroom cabinets were made out of repurposed vintage dressers with amazing sinks.
BEAUTIFUL hardwood flooring throughout and true tile (not laminate) in the wet areas.
Awesome backyard and patio.
Lovely full brick exterior with heavy barnwood shutters.
Best of all? They converted the garage into 3/4 of a large sunroom and 1/4 of it as a laundry room.
The sunroom would be my new studio.

AND - we had the exact 20% down payment stashed away. On the dot.

I could picture it all... until we put in our offer and the agent said someone else had offered the full listing price. 

Devastation.

After a number of shed tears, JD gave me the sweetest pep talk. He reminded me that God didn't intend for it to be our first home, but rather our inspiration. We would find an older home and give it the same love and care as that couple did for the home we fell in love with. We could do that too. We just needed to find a home with a nice floor plan, a bedroom that our queen-sized bed could actually fit in (not a whole lot of those in our price range), a couple of bathrooms, a room for my studio, and a great backyard for gardening. 

We pulled our bootstraps up, found a great real estate agent and have been searching ever since.

Houses seem to get a little redundant after you've seen a few, so I decided to make a scoring sheet for each house. If you work with a realtor, she / he will normally give you an MLS sheet on the house. This describes the specifics: square footage, number of bedrooms and bathrooms, size of rooms, appliances included, etc.

You can write notes on these sheets but I prefer charts and checklists. After looking at a couple of houses, I decided to design the survey below. It's a free printable and we would love for you to use it if you think it would help in your house search too!

Today, we continue in our adventure for buying our first home with clipboard in hand:


Lovely clipboard from the dollar bins at Michael's

How to Use the Printable:
Write the house address at the top. When you're finished looking at houses for the day, rank them in the top right-hand corner. (example: 1/6)

Basically, I created a scale from 1 - 10 for the appearance of the neighborhood, exterior of house, bedrooms, bathrooms, kitchen and backyard. For closet space, I rate it on how much space there is, the appearance of the closet, etc. For elbow grease, I rate it from 1 (being not a whole lot of work needs to be put into it on our part) or 10 (may need to demolish the whole thing and rebuild it from the ground up). There should be enough space between the lines for you to write notes on each topic.

At the bottom, you'll find a Notes box and places to check off if there is a garage and laundry room, as well as the types of flooring in the house (carpet, hardwoods, tile, laminate).

Most importantly, the question of if you can make it a home... 
Yes, you can make any house a home
but think about if it's worth it.
Is it worth investing into?
Does it have charm / character or can you add that yourself?

**If you choose to share this free printable on your blog or website, please give credit where credit is due and link it back to our blog, Jitney's Journeys. 


Right-click, save image, then print. May be printed on a 5" x 8" index card.

We hope this helps in your search of a home! 

Don't forget to check out our other printables in our Etsy shop here.


DIY Blog Design : How to Add a Social Media Bar to the Bottom of Posts {Step-by-Step Tutorial}


Would you like to add a social media bar to the end of every post?

Something that looks a little something like this:

Great news - we're going to show you how!!

Most of you probably won't need this entire step-by-step tutorial but we wanted to offer it up just in case.

First step: Go to Share This

http://sharethis.com/

This site offers several ways to add a toolbar but we'll show you how we created the one for our blog.

STEP 1: Get The Button
Click "Get it now" in the Multi Channel box


STEP 2: Pick Your Platform
If you use Blogger (or blogspot), click on this button.


STEP 3: Stylize It
You can pick whichever style you'd like but we went with the horizontal, simple look (no visual stats). The last choice is the vertical style that you may have seen on some blogs.


STEP 4: Customize
This is where you can pick your thumbnail size (we decided on the large icons).


STEP 5: Customize Your Icons
Scroll down and you can drag the social media buttons from the right side and add it to the "Selected Services" box on the left side. Put it in the order you prefer and click "FINISH: Get the Code".


STEP 6: Sharing Preference
You can choose between Multi Post or Direct Post. We like the Multi Post because it doesn't take our readers away from our site. Click your preference and hit "GO!"


STEP 7: Add Page Element
You're almost finished...
When you clicked "GO!", it should direct you to Import Page Element from your blog. Click on the Add Widget button and Share This does the rest. How easy is that!?


You're Awesome
Here is a screenshot of what our layout page looks like with the ShareThis element.